Developing with Rust and the Raspberry Pi Pico
Harnessing the Power of Rust for Microcontroller Projects with the Raspberry Pi Pico
Introduction #
The Internet of Things (IoT) and microcontroller development are areas that bring great opportunities for creators, letting you interact with the physical world in new and imaginative ways. Rust, as a programming language, brings its own strengths to the table, such as speed and safety, which are essential for turning a good idea into a working IoT product.
This guide is all about getting you up and running quickly with a Rust project on the Raspberry Pi Pico. It will show you how to set up your project, and lead you through the practical steps of flashing and debugging your code with the Raspberry Debug Probe. It’s a straightforward path to bringing your IoT project to life.
Prerequisites #
Prepare your environment, and let’s dive into the exciting world of Rust and the Raspberry Pi Pico. We have leverage the rp2040 HAL (Hardware Abstraction Layer) with the rp-pico BSP (Board Support Package), which abstracts the complexities of the RP2040 microcontroller.
- Ensure Rust and Cargo are installed on your development machine. Follow the official installation instructions.
- Obtain a Raspberry Pi Pico board RP2040 to complete this project.
- Acquire the Raspberry Pi Debug Probe for a streamlined development process.
- This project can be executed from various platforms, including Raspberry Pi 4, Windows PC, macOS, or Linux. A Raspberry Pi 4 is used in this guide.
Getting Started #
Setting up an embedded Rust project for the Raspberry Pi Pico involves 3 general steps:
1. Environment Preparation #
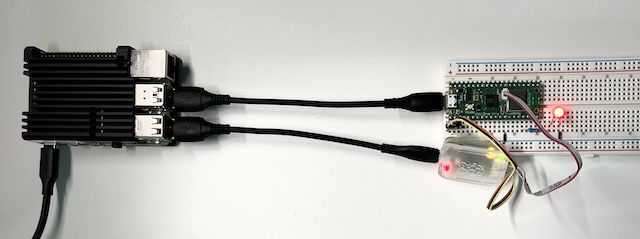
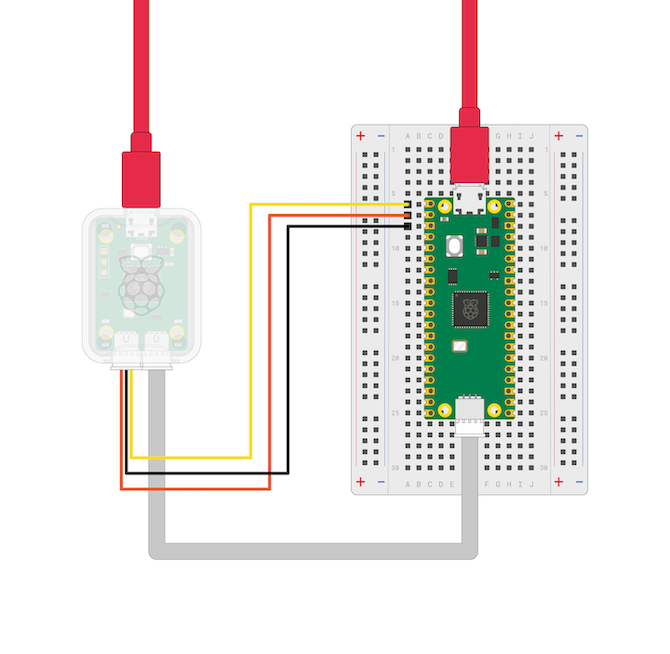
Hardware Setup: Connect the Raspberry Debug Probe to the Raspberry Pi Pico as outlined in the Raspberry Pi Debug Probe documentation.
Development Environment Setup: Verify Rust and Cargo installations with
rustc --version.
2. Debug Probe and SWD Connection Configuration #
Install the necessary tools for deployment and debugging.
sudo apt install libssl-dev libudev-dev openocd gdb-multiarch
rustup self update
rustup update stable
rustup target add thumbv6m-none-eabi
Test the debug probe connectivity.
sudo openocd -f interface/cmsis-dap.cfg -f target/rp2040.cfg -c "adapter speed 5000"Configure udev rules to allow non-root access to the Raspberry Pi Debug Probe. For a detailed guide, see Getting Started with Rust on a Raspberry Pi Pico.
a. Get the necessary information for PID and VID using
lsusb | grep Probe. The output should look like this:Bus 001 Device 003: ID 2e8a:000c Raspberry Pi Debug Probe (CMSIS-DAP)The PID is
2e8a, and the VID is000c.b. Add a file to the udev rules, for example:
sudo vim /etc/udev/rules.d/99-raspberrypi-debug-probe.rulesc. Append the following two lines to the end:
# Raspberry Pi Debug Probe
ATTRS{idVendor}=="2e8a", ATTRS{idProduct}=="000c", MODE:="0666"
The
0666permissions allow all users to read and write but not execute the device nodes.d. Restart the service with
sudo service udev restart.
3. Rust Project Setup and Compilation #
Use the Raspberry Pi Pico Project Template to create a new repository.
Clone the new project into you development machine.
Go to the new project and get the dependencies and build it
  cargo install elf2uf2-rs --locked
  cargo install flip-link
  cargo install probe-rs --features=cli --locked
Compile and flash the project using
cargo run. Optionally, for a Raspberry Pico W, connect an external LED to a GPIO pin for visual feedback, such as GP 13. Include the following lines:let mut light_pin = pins.gpio13.into_push_pull_output(); loop { ... light_pin.set_high().expect("Cannot turn the LED on"); ... light_pin.set_low().expect("Cannot turn the LED off"); ... }

Refer to the Raspberry Pi Pico Pinout documentation for more details.
Conclusion #
As we wrap up, we’ve managed to give the Raspberry Pi Pico new abilities with Rust—flashing it with new code, debugging on the fly, and controlling things like lights and sensors. This project it’s a glimpse into a future where using Rust for microcontrollers can lead to even more clever and unique tech creations.
There are numerous guides to get you started with Rust and the Pico board, offering various methods to achieve similar outcomes. Whether it’s simply using the Pico as a USB device, connecting it to a Raspberry Pi SoC, or utilizing another Pico as a debug probe, each approach has its advantages, allowing you to choose what works best for you.
Looking forward, as we dive deeper into Rust and its use in microcontrollers and SoC’s, we’re sure to find even more exciting ways to innovate and build.