Developing a Zephyr Freestanding C++ Application
Embedded systems development is constrained by limited resources, strict timing requirements, and close coupling with hardware. Real-time operating systems (RTOS) address these challenges through deterministic task scheduling and predictable interrupt handling. They ensure systems respond within defined time bounds even under load, shifting the focus from raw throughput to timing guarantees and reliability.
In the first post 1 we examined how real-time kernels such as Zephyr offer reusable APIs and robust middleware for safe, maintainable designs. The follow-up post 2 showed why Zephyr is a modern choice for MCU-based projects.
The goal of this post is to show how to build a minimal, C++-ready Zephyr project for the Raspberry Pi Pico using the freestanding application pattern. We will walk through toolchain setup, project scaffolding, environment configuration and flashing your first application—cleanly, repeatably and independently of the Zephyr source tree.
What Is the Freestanding Application Pattern?
In Zephyr, the freestanding application pattern means your project lives in its own repository, separated from the Zephyr source tree. This keeps your codebase clean, simplifies version control, and lets you fully leverage Zephyr’s tooling without entangling your application with OS internals 3.
Steps
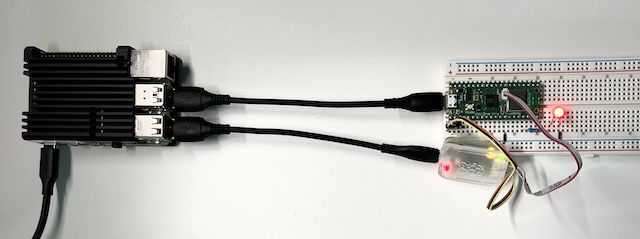
This guide walks you through setting up a clean, C++-ready Zephyr project for the Raspberry Pi Pico. You’ll create an isolated workspace, install the essential SDK, configure your environment, and build and flash your application, while keeping your codebase independent of the Zephyr OS tree based on 4. The hardware setup, including how to wire up the Pico and connect the Debug Probe, follows the same approach described in 5.
Requirements
- Linux host (macOS and Windows also work)
- Raspberry Pi Pico (Model 1)6
- Raspberry Pi Debug Probe7
- Optional: LED wired as in the Embedded Rust with Pico guide5
Step 1 – Toolchain & Workspace Setup
This step creates an isolated build environment, checks out just the parts of Zephyr you need, and installs the Pico-compatible cross-compiler.
-
Set up a Python virtual environment – keeps Zephyr tools from polluting the system Python.
python3 -m venv ~/zephyr-venv source ~/zephyr-venv/bin/activate pip install west -
Initialize a workspace pinned to Zephyr v4.1.0 –
west initadds azephyrprojectfolder;--mrselects the release tag.west init zephyrproject -m https://github.com/zephyrproject-rtos/zephyr --mr v4.1.0 cd zephyrproject -
Pull only required modules –
west update --narrowskips optional drivers and HALs, saving bandwidth and disk space.west update --narrow west zephyr-export west packages pip --install -
Install the Zephyr SDK toolchain – downloads just the arm-zephyr-eabi toolchain needed for the Raspberry Pi Pico.
west sdk install --toolchains arm-zephyr-eabi --version 0.17.0
Now, you have a clean workspace with the minimum tools required to build Zephyr firmware for the Pico.
Step 2 – Verify Tool Versions
Modern Zephyr expects recent tooling; outdated versions are the cause of most early build errors.
-
Check the following versions
cmake --version && python3 --version && dtc --version && ninja --version && west --version -
Compare against the minimums
Tool Role in build Min version CMake Generates Ninja build files 3.20 Python Runs West and helper scripts 3.10 DTC Compiles device-tree sources 1.6 Ninja Fast parallel build backend 1.10 West Zephyr’s meta-tool for fetch/build 1.0
If any tool is below these versions, upgrade it using your package manager or the official releases. For detailed instructions, refer to the official documentation3.
Step 3 – Create a New Project
A template repo gives you a ready-made CMakeLists, sample prj.conf, and board setup for you focus on code, not
scaffolding.
-
Click Use this template ↗ and create your repo under GitHub.
-
Clone it locally and enter the directory:
git clone git@github.com:<your-username>/<your-new-project>.git cd <your-new-project> -
Edit
CMakeLists.txtorprj.confonly as needed.
Step 4 – Configure Environment Variables
An env.sh file pins all paths so every developer builds the same way.
export WORKSPACE=$HOME/zephyrproject        # where Zephyr lives
export BOARD=rpi_pico                       # default board
export ZEPHYR_BASE=$WORKSPACE/zephyr        # Zephyr source path
export ZEPHYR_TOOLCHAIN_VARIANT=zephyr      # use Zephyr SDK
export ZEPHYR_SDK_INSTALL_DIR=$HOME/zephyr-sdk-0.17.0
Make the env.sh executable and source it before building:
chmod +x env.sh
source env.sh
Step 5 – Build · Flash · Log
A basic Makefile is provided to simplify building and flashing without needing to switch directories or recall repetitive commands.
-
Build – compiles the app and generates
zephyr.hex.make build -
Flash – programs the Pico through the Debug Probe (SWD).
make flash -
Log – opens the UART console with Picocom.
make logExit Picocom with
Ctrl-A, thenCtrl-X.
Each make target wraps the equivalent west build, west flash commands for
consistency.
C++ Integration Notes
- Enable C++: add
CONFIG_CPP=yand set the standard, e.g.CONFIG_STD_CPP14=y. - Avoid static locals inside
main(); they require guarded initialization. - Use
k_thread_create()ork_workfor background work instead ofstd::thread.
Summary
This guide helps you build a standalone Zephyr project for the Raspberry Pi Pico using a clean, template-based setup. It keeps your application independent of the Zephyr source tree, ensures reproducible builds with a shared env.sh file, and streamlines development using make targets for building, flashing, and logging. With minimal changes, you get a C++-ready environment tailored to the constraints of the Pico—making it fast to get started and easy to maintain.
References
-
How an RTOS Simplifies Embedded Development – concept overview of RTOS benefits. ↩︎
-
Zephyr RTOS: Introduction and Ecosystem Overview – survey of Zephyr’s architecture and community. ↩︎
-
Zephyr Getting Started Guide – official steps for initializing and using Zephyr. ↩︎ ↩︎
-
Zephyr Freestanding Application Pattern – explanation of the out-of-tree application model. ↩︎
-
Embedded Rust with Pico – hands-on guide showing LED wiring and UART logging. ↩︎ ↩︎
-
Raspberry Pi Pico Documentation – overview and specifications. ↩︎
-
Raspberry Pi Debug Probe – SWD + UART adapter for flashing and logging. ↩︎